
Using Beaver Builder and Restrict Content Pro together
Whenever I need to create a membership site, I use Restrict Content Pro. I like that it is powerful and extensible, but also relatively straightforward without a lot of front end bloat. The shortcodes for controlling visibility of content also allow for a lot of granularity. I’m sure many other membership plugins are great but I guess I’m used to this one so it’s my go-to.
I also use Beaver Builder all the time, on pretty much every site I build these days, as a matter of fact. (I like it so much I even wrote a mega menu plugin for it) It is incredibly powerful but still easy enough that my clients often can pick up how to edit a page without even needing to be trained.
In particular, this page builder really comes alive when extended with Beaver Themer. Beaver Themer unlocks some of the real power of Beaver Builder, allowing you to modify your theme with the same power and simplicity that you do a page. You can customize various theme templates, and it also opens up the ability to control the visibility of each row/module via some very powerful Conditional Logic (found in the Advanced tab).
BB’s Conditional Logic control is a whole other blog post by itself (luckily you’ll find plenty of content about this on Beaver Builder’s website) but one thing I wanted to touch on in this post is how to combine the power of RCP with Beaver Builder. I’m writing all this down here since I am working on a big site right now where we really needed to bring out all the tricks to control what shows up where and when, and I wanted it to be written down not just for myself to refer to later, but also in case somebody else needs to use this!
BB+RCP Method One: Shortcodes
Being able to insert a saved row/module anywhere with a shortcode is one of my favorite features of Beaver Builder/Themer. Any time you wished you could insert some beautiful custom-designed content into another plugin, Beaver Builder shortcodes are your answer. By simply inserting the following text you can insert a saved row/module anywhere that you can insert text! Gravity Forms confirmation setting? Sure! Header of a third party theme? Don’t mind if I do! There are so many places and ways to use these, you are no longer limited to the dry boring text settings of most plugins.
So if you’ve used RCP shortcodes before, you might be predicting where I’m going with this… First I’ll back up — The way RCP restrict shortcodes work is that you sandwich your content between opening and closing shortcode tags. So if you wanted to only show some content to paid users, you’d use something like [is_not_paid]Thanks for your support![/is_not_paid] Or if you only wanted to display a login form for users who are not currently logged in (so you don’t confused logged-in people with a random “log out” link, which is what it shows if you are already logged in), you’d use this: [not_logged_in][login_form][/not_logged_in] I end up combining these shortcodes to be able to target almost any kind of user. Logged out people see one thing, expired people see another, active members of a lower subscription see another and active VIP users see yet another.
So, the way to combine these is by sandwiching a BB shortcode between these RCP shortcodes. So instead of just showing a boring “sorry you don’t have accesss to this content” message, you can display a visually lovely and friendlier block of content in a saved BB row. So for example I just did this on a recent site:
[restrict level="2" message=" "][acf-podlove-player][/restrict] <!-- this targets several of my client's higher-level subscriptions with one single argument, displaying an audio lesson -->
[restrict subscription="1,2,3,4" message=" "][/restrict] <!-- lower level members see some slightly more generic content -->
[is_not_paid][/is_not_paid] <!-- logged-out and expired people see a friendly message letting them know that they need to eitger login,  sign up or renew -->
BB+RCP Method Two: Conditional Logic
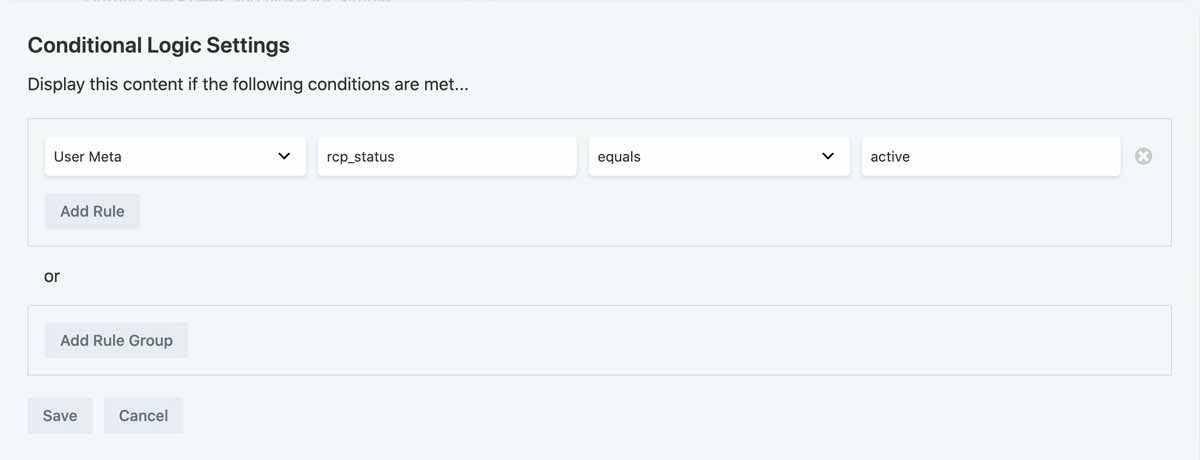
This is the one that I recently stumbled across that I really wanted to be sure to write down for myself. I had been planning to [attempt to] write a plugin that would extend the Beaver Builder conditional logic API to add the ability to turn things on or off depending on a user’s subscription or membership status. Sometimes the RCP shortcodes don’t fit or are too cumbersome, and instead you might want to just control a single module’s settings. I thought I’d have to write something myself until I scrolled down a bit and realized there was a whole category of conditionals I had never played with — User Meta! This is where all of the information about your users is stored, including, in the case of RCP, their subscription info!
So here are some of the handy RCP user meta variables that you could test for if you wanted:
- rcp_expiration This is a date formatted like 2023-01-01 11:59 but this means you can test for it with the greater than/less than operator, for example to only show something to users who signed up before a certain date.
- rcp_status – This will be active, free, none, pending, cancelled, or expired.
- rcp_subscription_level: This is the access level of the user (our site has like 8 different higher-level membership subscriptions and that is a pain to write conditionals for each, so we differentiated these from the lower-level subscription level by assigning an access level of 2)
- rcp_joined_date_1, rcp_joined_date_2: (there will be one for each membership level they belong to, if you allow multiple)
- rcp_signup_method: not real useful since it’s blank for thingns like Stripe or PayPal but who knows.
- rcp_notes: The only thing where I could imagine using this is if you always edited these notes and included a certain keyword in your notes, you could test for that with this.
Anyway so you can see where this might be really useful on a membership site!
Bonus Content: Test for RCP membership/status with CSS
With this same project I had several instances where I wished that I could turn certain things on or off with a simple line of CSS. For example, maybe you have a page (like we do on this project) that outlines all of the member benefits you get with signing up, and you want to show the active ones (that the current user actually has access to) in a brighter color than the inactive ones (that they need to upgrade to get access to). For this it would be a giant pain in the rear to use the above two methods to show and hide various different modules where the only difference is the color of a link. This is where WP body classes come in.
WordPress already inserts a bunch of useful classes into the <body> element, like what page you’re on, what the parent page is, and even whether you’re currently using the BB editor or not (.fl-builder-edit). With some extra code in your header.php, you can also insert some useful information about your user in there!
First make sure you’re using a child theme. Then copy header.php from the BB theme into the child theme’s folder. Now you can safely edit it as needed.
Below is the code I used. I added this right before the opening <body> tag.
if ( is_user_logged_in() ) { // adds a class to the body to tell us about this user so we can style things accordingly
$statusclass = "logged_in "; //$statusclass is what will be appended to the WP body classes.

// now lets get their user ID
if( empty( $user_id ) ) { $user_id = get_current_user_id(); } // User ID number.

// Retrieve the customer record associated with this user ID.
$customer = rcp_get_customer_by_user_id( $user_id );

// If no customer record is found, there will be no memberships.
if ( empty( $customer ) ) {
$statusclass = "no_membership";
} else { /* assuming you can get their RCP record */

// Once you have the customer object, you can get the customers memberships.
$memberships = $customer->get_memberships();

foreach ( $memberships as $membership ) {
// $membership will be an RCP_Membership object.
$status = $membership->get_status();
$recurring = $membership->is_recurring();
$membership_level_id = $membership->get_object_id();

$statusclass .= $status . " " . $recurring . " ";

// in my actual code I also have a big "switch" statement here to convert the subscription IDs to readable names, which we use in our CSS. I will shorten it here just so you get the gist of it
switch ($membership_level_id) {
case 1:
$statusclass .= " Silver ";
break;
case 2:
$statusclass .= " Gold ";
break;
case 3:
$statusclass .= " Platinum ";
break;
} /* end of switch */

} /* end of foreach */

} /* end of if-else */

} /* end of test if is user logged in */ else {
$statusclass = "not_logged_in ";
}
?>

<body <?php body_class($statusclass); ?>
And everything else after this stays as it was.
Now you can add some CSS to control how things look for different kinds of users. For example on this page we had a default box appearance, then we “turned on” certain things with color by targeting the CSS:
/* paid appearance */
.benefitbox {/*some default appearance styles*/}
.active.Member .benefitbox#member,
.cancelled.Member .benefitbox#member,
.active.Patron .benefitbox {background:#FBF8E2; border:2px #F2D503 solid;}
So there you go! Everything you need to do some pretty cool stuff with Restrict Content Pro and Beaver Builder! I hope this is useful to someone! 🙂